Amiga 4000 Rev. 2019
The Power Supply...

After the last intervention that saw the entire replacement of the original electronics of the power supply because now exhausted, I thought of revising the ventilation and reviewing the general state of the board taken from an AT power supply and its housing. So armed with patience I disassembled everything I inserted a plastic base as an insulator between the electronics and the frame and repositioned it all. I replaced the 90mm fan with a low-profile low-noise fan and fixed it with the appropriate rubber caps instead of using the usual fan screws. From an acoustic point of view I did not find a substantial improvement since the bulk of the noise is due to the shape of the air intake on the power supply chassis that would be completely removed and replaced with a fan grill.
Floppy Gotek emulators
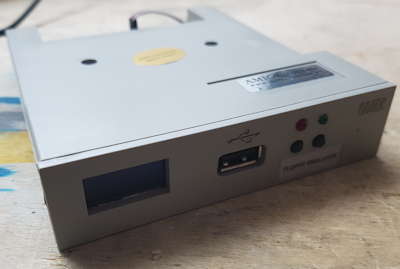
In consideration of the fact that the 4000 internal floppy disk could no longer read any floppy I decided to replace it definitively with a modern Gotek floppy emulator thanks to which the floppy disk virtualization grants some indisputable advantages. One of the many is to obtain absolute reliability in reading data from floppies, something not at all obvious in the reality of past years. Are you wondering what the floppy reliability is for? Well suppose you need to update your CyberStormPPC firmware! Even if the risk of "beating" such a card is not too big thanks to Gotek, the stakes are too high to take this path in my current conditions! In any case, after the hardware installation I tested the gotek by installing OS 3.1.4 above the previous 3.9 and it was a pleasant walk considering that in a folder of the USB stick I had copied all the relative virtualized floppy disks, so at every change request floppy was enough to select the relative image and the installation continued in a big way. But the Floppy emulator offers much more in fact thanks to the AdfOpus (Windows Application) it is possible to create floppy adf on PC to copy in it anything you have to transfer to the Amiga, in essence it is a bit like having a USB port for the exchange of data with a pen.
ROM 3.1.4 Rev.: 46.143 installations
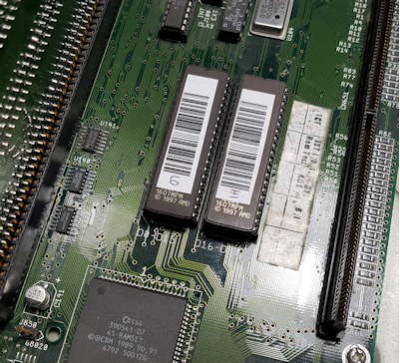
I had already planned a ROM upgrade for a long time, then tired of reboots to remap the kickstart and considering the very recent hyperion Entertainment with the new ROM 3.1.4, I decided to buy them. Obviously not before a survey on the differences between ROM 3.1.4 of those 3.x of Cloanto. So, being already under REV 2019 (Amiga already disassembled), with extreme care I took the CyberVisionPPC in order then the CyberstormPPC and armed with small screwdrivers I began to pull out the original ROMs to replace them with 3.1.4. The new ROMs solve many problems that annoyed the boot operations, first of all the scsi.device is finally able to recognize the partitions exceeding 4GB then a series of impressive bugs that I am not going to list here have been solved.
The SATA breakthrough...
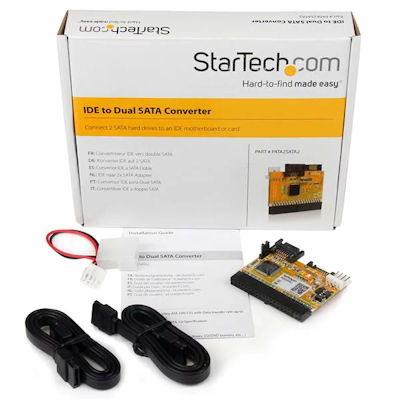
As previously mentioned one of the biggest problems of the 4000 is interfacing with modern storage devices, having only an IDE controller available on the Mainboard. But the turning point was the adoption of an inter-interface capable of transforming the 4000 IDE controller into two beautiful SATA ports seen from the Controller side respectively as a master unit on the first SATA port and slave units on the second. Essentially the interface perfectly adapts the SATA peripherals making them look like IDE / PATA and fully supporting the ATAPI for CD DVD ROMs With the transition to SATA the doors to the SSDs have opened, the annoying flat IDE has disappeared and the whole it worked great ... Obviously not everything is as easy as it seems in fact given that in standard ATA pin 20 is defined as a mechanical pin on the female connector the corresponding compartment is usually clogged, so in these cases pin 20 must be absent from the male connector or from the device to be able to insert the interface on the IDE connector present on the Amiga mainboard. Obviously since this is not feasible it is advisable to make a hole at pin 20 of the IDE connector of our interface. A modeling drill with a 1mm bit is sufficient for this purpose. Once the change is made, we can inexperience the interface directly on the amiga mainboard and proceed to the SATA connections. For the occasion I chose a 120GB solid state drive Kingston that I think is more than enough to contain practically everything you need and not just for any sort of work on our Amiga
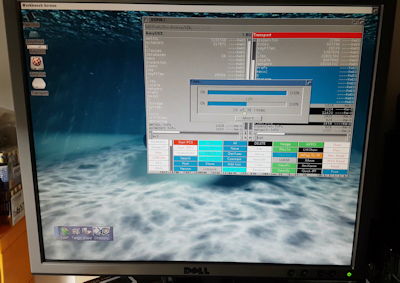
Partitioning of SSD disk
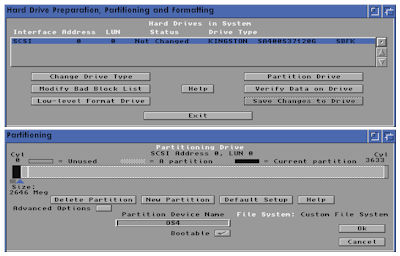
After the previous experiences where in the Maxtor 230GB disk I had reserved only one partition for the operating system, this time I reserved two partitions for two operating systems, one for OS3.1.4 and one for OS4.1. Just over two GB for each operating system are much more than enough to contain any further updates, since on AmigaOS the order of the system components is exemplary to say the least, there are no dangers to remain without space. I then left a partition of about 102GB for data and software. I have assigned a lower priority to the partition dedicated to OS3 so that OS4.1 starts first and directly. For formatting partitions I used SFS (SmartFileSystem 1 Dos Type) this for multiple reasons of performance compatibility and reliability. I found that to start the 4000 I had to partition under OS3.1.4 otherwise, or by partitioning from OS 4.1 the 4000 fails to boot, I suppose this is due to the fact that the ROM 3.1.4 with which it starts the system, do not see the disk bootblock partitioned by ROMs 4.1
OS4.1 installation and copy of OS3.1.4
Having partitioned the SSD disk into 3 parts and then having formatted the first two partitions assigned them as volume name respectively OS3 and OS4, I installed OS4 from CD into the dedicated OS4 partition and then I copied all the data from the passing SCSI disk including the updated OS3.1.4. The passing disk became necessary because with the active system under SATA only the SCSI port of the CyberstormPPC remained as a peripheral useful for data exchange. The IDE controllers on my X-Surf can't work under OS4.1 and having nothing else I used a 4GB SCSI disk, so in summary, I first copied the data from the Maxtor PATA IDE disk onto the SCSI disk later from the SCSI disk to the partition dedicated on the SATA disk, nice ride there is no doubt about it ... The final result is therefore OS3.1.4 on the OS3 and OS4.1 partition on the OS4 partition both bootable so the 102GB data partition all in SFS and fully functional.